Pure water machine how to install the water machine installation steps
Water purifiers are the most common water treatment equipment and cumulative sales so far rank first in the country. The first step for many customers who are engaged in water purifiers is installing water purifiers. As long as they can install a pure water machine, it means that your water purification business has already started. So, how to install the pure water machine? Next we will take a look at the installation steps of the water machine .
Pure water machine installation steps
One, pure water machine installation sequence
The automatic reverse osmosis water purifier is a facility that automatically controls the tap water of the terminal with a microcomputer and is easy to install and use. When you purchase or install the machine for users, in order to ensure the installation quality, you can usually install in the following order: Install RO membrane → fiber filter → precision activated carbon filter → fiber filter → punch → install host → close the main valve → install Water tees → Install water inlets → Water inlets directly to fiber filter tubes → Check for water leaks → Install ball valves on gobs → Gooseneck faucets → Gooseneck taps to rear carbon outlets → Wastewater ratios to sinks → Rear activated carbon front-end water pipe → Turn on the power → Check the water quality → After the water quality is qualified and stable → Connect the Ball Valve water pipe on the water tank → Make water → Release water → Remake water → Finish installation.
Second, the cabinet type water machine installation
(a) Install the RO membrane
Remove the RO film packaging film, remove the water tube at the RO membrane housing cover, unscrew the RO membrane housing cover, insert one end with two rubber seals into the hole in the RO membrane housing, and rotate it to the bottom. The seal of the end cap of the membrane shell is first moved to the screw hole of the RO membrane shell, and the shell cap is tightened by hand, and the water pipe is installed and tightened.
Check if the elbow at the end cap is loosened. If it is loose, remove it, wind 2-3 laps of raw material tape, and screw it on as it is.
Special attention: Before disassembling the outer packaging of the RO membrane, the hand should be washed clean, and the installation process should also keep the hands clean, and it must not cause pollution to the RO membrane.
(b) Install the filter
Remove the plastic packaging film, and insert one side of the double-sealing ring of the fiber filter, the granular activated carbon filter and the fiber filter into the connector of the filter cap. Put a white petrolatum around the O-ring on the filter bottle, turn on the filter bottle and tighten it by hand. When using a special wrench, the tightening process should be even and not too large.
(c) Install a fixed host
1. Wall mounting: Two holes with a diameter of 8 mm are punched in the selected mounting position. Put the plastic expansion bolt that is carried randomly, screw in the screw, hang it on the main unit and tighten the screw.
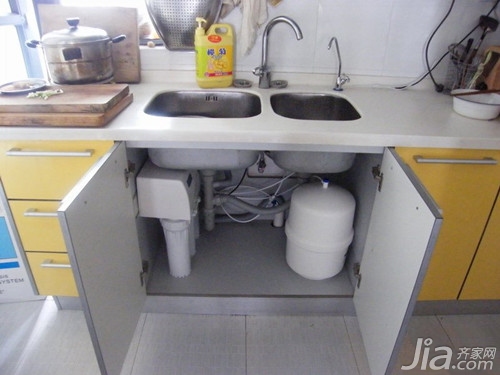
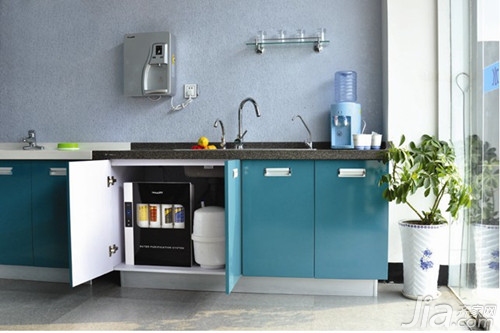
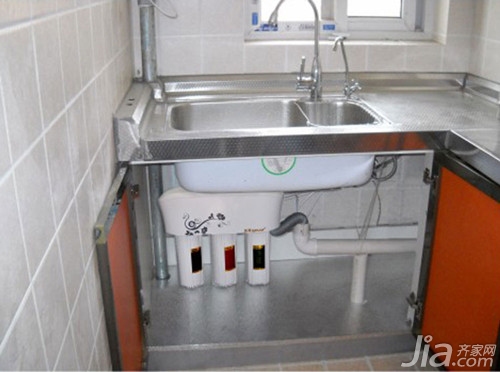
2, cabinet installation: can be fixed without drilling, choose a good place to stabilize.
Regardless of whether it is installed on the wall or in the cabinet, the future replacement of the filter element and the convenience of maintenance should be considered. Especially when installing in the cabinet, the water machine should be placed outside the cabinet door for installation.
3. Install gooseneck faucet preparation: Install at customer selected location. If the gooseneck faucet is to be installed on the conditioning table of the kitchen, a hole with a diameter of 12 mm should be drilled on the surface of the conditioning table. If the gooseneck faucet is installed on the wall, drill two holes with a diameter of 6 to 8 mm in the selected position, insert a plastic bulge, and secure the bracket to the wall with a tapping screw. , Then install the gooseneck faucet in sequence.
When drilling holes in marble countertops, special drills should be used to locate the positioning plate. When drilling holes in marble (synthetic material), ordinary twist drills should be used. Both types of punching use ordinary hand drills, do not use impact drills.
4. Install the ball valve on the water tank: Wrap 6 to 8 rings of sealing tape around the thread of the water tank, screw it into the ball valve, and tighten the ball valve with your hand. Place the water tank in a suitable place.
5. Install gooseneck faucet: When installing the gooseneck faucet, magnify the soft rubber ring above, put the small soft rubber ring, hard rubber pressure plate and metal washer at the bottom, then tighten the nut.
6. When installing the water pipe on the water purifier, a pipe plug must be placed at the end of the pipe to prevent water leakage.
The above steps on how to install the pure water machine and how to install the pure water machine are introduced here. I hope to help you. For more information, please visit this website. Stay tuned.
Water Purifier Construction Installation Renovation Steps Renovation House Steps Renovation Steps and Budget
Ball Valve
Ball Valve ,Steel Ball Valve,Stainless Steel Ball Valve,1 Inch Ball Valve
Zhejiang Chenxiang import and export trade Co., Ltd , https://www.chenxiang-valve.com